Are you tired of searching for the perfect color for your project? I used to spend hours looking at color combinations and trying to match what I found on google. Well worry no more, I’ve got a quick and easy fix for you! I’m going to show you how to add a custom color palette in Silhouette Studio. The best part is, you only have to add these once, and they stay forever.
You’re probably wondering when will I ever use this. Well, I do this when I’m creating projects that I plan to print and cut. For example, I’m making an Easter card and I don’t have those beautiful pastel colors of cardstock. No worries, I can print and cut each element of the card in the perfect shades and I know they will all coordinate too!
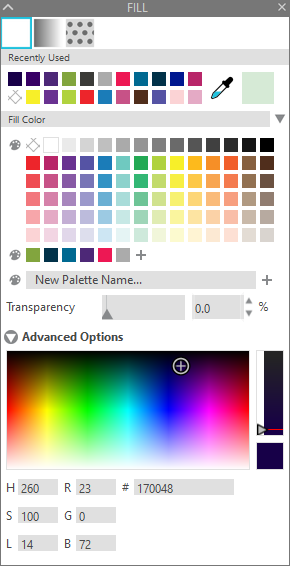
Without further ado, let us jump in and get started. Open your fill panel and at the bottom, you’ll see the option to add a new color palette.

Type in the name of your new palette, now when you hover over it, the name will show. This is a great way to keep all your new color swatches organized.
When you hit the + key it opens up the advanced options. There are a few different ways to define a new color, like adding in the hue, saturation, and lightness. The most common way is by the hex code, this is the part listed next to the #.
The best way to find new color combinations is by doing a Google search and using the hex codes from photos. I like using ColorZilla plugin for Chrome. Just google it and you’ll find the extension to add. I love this one because I can click on a color and it will copy the hex code and I can paste it anywhere.
I paste the hex code right on my silhouette mat and once I’ve got all the colors then I enter them into my palette. I do it this way because it also grabs the # and I find when I place that right into the space on the fill panel, I struggle to just delete the #. So for me, it is easier to type in the code myself.
Here is the video with the complete step-by-step on how to make new color palettes.


